Getting started
To begin your journey with NextBillion.ai's Asset Tracking iOS SDK, make sure you have met the necessary prerequisites, as outlined in the "Prerequisites" section. Then, proceed with the step-by-step installation instructions to integrate the SDK into your iOS project.
Prerequisites
Before integrating the SDK into your application, ensure that your development environment meets the following prerequisites:
-
NextBillion.ai API Key: Obtain a valid access key from our platform. This access key is essential for authentication and enables you to utilize the SDK's services.
-
Platform Compatibility: Make sure you're using the right tools and versions:
-
IDE: Xcode 13.2.1 or a more recent version.
-
Minimum Deployment Target: iOS 11.0.
-
By meeting these prerequisites, you can guarantee a smooth and successful integration of our SDK into your application. These requirements have been established to ensure compatibility and optimal performance, enabling you to leverage the full potential of the SDK's features.
Installation
To integrate NextBillion.ai's iOS Asset Tracking SDK into your iOS project, follow the steps below
Step 0: Creating Your Project Folder
Before proceeding with the instructions below, you'll need to set up your project folder. You can do this by either creating a new empty iOS app project in Xcode or by cloning one from our official GitHub repository.
Creating a New Project in Xcode
-
Open Xcode and go to
File>New>Project. -
In the popup window, choose
iOS>Appand clickNext. -
Fill in your project details on the subsequent screen, and then click
Nextto create your empty project.
Alternatively, Cloning from GitHub
If you prefer to start with our official demo code repository from GitHub, you can use the following command-line instructions
1 2git clone git@github.com:nextbillion-ai/nb-asset-tracking-ios-demo.git cd nb-asset-tracking-ios-demo
In the next section, we will execute specific commands within this project to complete the configuration. This step ensures you have the necessary project structure in place to seamlessly integrate the NextBillion.ai iOS Tracking SDK.
Step 1: Installing Carthage
To integrate the NextBillion.ai iOS Tracking SDK, you'll first need to install Carthage, a dependency manager for iOS. There are several methods for installing Carthage.
Using Homebrew (Recommended)
We recommend using Homebrew for a straightforward installation process. Open your terminal and execute the following commands.
1 2brew update brew install carthage
Using the Installer
Download the Carthage.pkg file for the latest release and follow the on-screen instructions to install Carthage. If you're installing the package via the command line, you may need to run the following command first:
sudo chown -R $(whoami) /usr/localUsing MacPorts
If you prefer to use MacPorts, you can install Carthage by running the following commands:
1 2sudo port selfupdate sudo port install carthage
Again, remember to delete /Library/Frameworks/CarthageKit.framework if you had a previous binary installation.
From Source (Advanced)
If you want to use the latest development version of Carthage (although it may be unstable or incompatible), you can clone the master branch of the repository and run:
make installThis method requires Xcode 10.0 (Swift 4.2).
Once Carthage is successfully installed, you'll be well-prepared to manage dependencies for your NextBillion.ai iOS Tracking SDK integration.
Install SDK via Carthage
To effortlessly integrate the NbAssetTracking framework using Carthage version 0.38 or above, follow these steps:
-
(Optional) Clear Carthage Caches
If you've previously downloaded the SDK, it's a good practice to clear your Carthage caches before updating. Execute the following commands:
rm -rf ~/Library/Caches/carthage/ ~/Library/Caches/org.carthage.CarthageKit/binaries/{MMKV,NBAssetDataCollectLib,NbAssetTracking}
-
Create a Cartfile
In your project directory, create a Cartfile using the following command:
touch CartfileOpen the Cartfile and add the following dependencies:
1 2 3binary "https://github.com/nextbillion-ai/nextbillion-asset-tracking-ios/releases/download/v1%2Fcarthage/MMKV.json" ~> 0.2.1 binary "https://github.com/nextbillion-ai/nextbillion-asset-tracking-ios/releases/download/v1%2Fcarthage/NBAssetDataCollectLib.json" ~> 0.2.1 binary "https://github.com/nextbillion-ai/nextbillion-asset-tracking-ios/releases/download/v1%2Fcarthage/NBAssetTracking.json" ~> 0.2.1
-
Run Carthage Update
Execute the following command to update the dependencies using
xcframeworks:carthage update --use-xcframeworks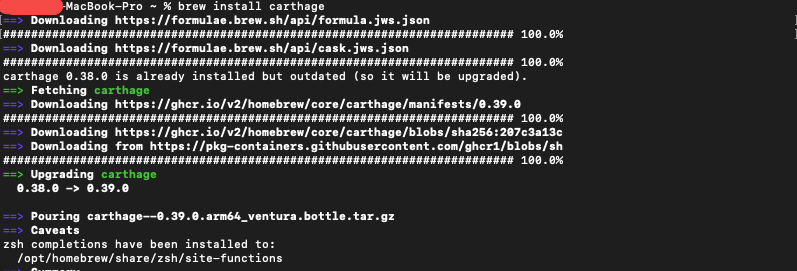
-
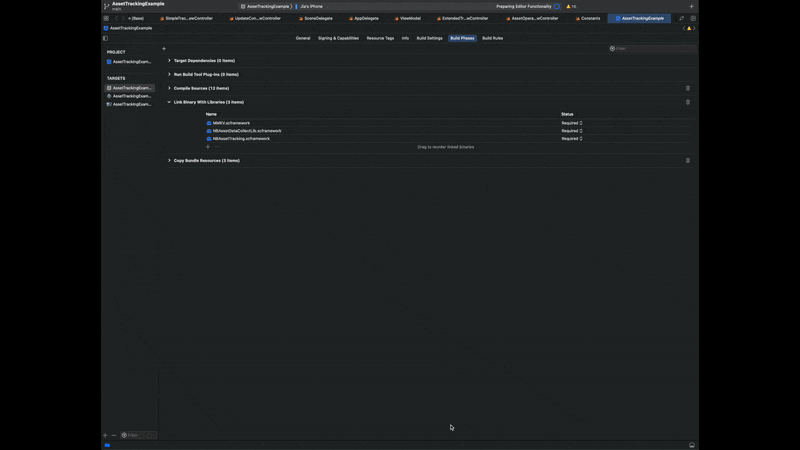
Link Frameworks
In your Xcode project, navigate to your build phase and link the following frameworks:
1 2 3MMKV NBAssetDataCollectLib NbAssetTracking
-
Embed Frameworks
Ensure that you embed these frameworks in your project to make them accessible for your application.
By following these steps, you'll seamlessly integrate the NbAssetTracking framework using Carthage, enabling robust location-tracking capabilities within your iOS application.
Step 2: Location Data Access Explanation
Add the following to the Info.plist to explain why you need access to the location data:
1 2 3 4 5 6<key>NSLocationAlwaysAndWhenInUseUsageDescription</key> <string>Request for location update</string> <key>NSLocationAlwaysUsageDescription</key> <string>Request for location update</string> <key>NSLocationWhenInUseUsageDescription</key> <string>Request for location update</string>
Step 3: Initialization
A common way to initialize the SDK is to put the following code in your AppDelegate, otherwise, please make sure you have called the code below before you start using any functionalities of the SDK.
1 2 3 4 5 6 7 8 9 10 11 12 13 14 15 16let assetTracking = AssetTracking.shared // Customize asset tracking configuration // Enable notifications for asset status changes // And Customize data tracking configuration let notificationConfig = NotificationConfig() notificationConfig.showAssetEnableNotification = true notificationConfig.showLowBatteryNotification = true assetTracking.setNotificationConfig(config: notificationConfig) let dataTrackingConfig = DataTrackingConfig(baseUrl: "api.nextbillion.io", dataStorageSize: 5000, dataUploadingBatchSize: 30, dataUploadingBatchWindow: 20, shouldClearLocalDataWhenCollision: true) assetTracking.setDataTrackingConfig(config: dataTrackingConfig) assetTracking.initialize( Key: "YOUR_ACCESS_KEY")
Replace YOUR_ACCESS_KEY with the access key provided to you by NextBillion.ai. This initialization step is essential to authenticate your app and enable seamless communication with NextBillion.ai's services.
Step 4: Asset Binding and Tracking
To initiate asset binding and tracking with the NextBillion.ai iOS Tracking SDK, follow these steps:
-
Creating an Asset
If you don't have an asset yet, you can create one using the following API: AssetTracking.shared.createAsset(baseUrl, assetProfile, completionHandler, errorHandler)
Retrieve the assetId from the API response.
Here's a sample class structure for handling the response:
1 2 3 4 5 6open class AssetCreationResponse { public let status: String public let data: AssetCreationResponseData{ public let id: String } } -
Binding the Asset to Your Device
Once you have the assetId, use the following API to bind the asset to your current device:
AssetTracking.shared.bindAsset(baseUrl, assetId, completionHandler, errorHandler)
After a successful binding, you're ready to start tracking the location of the asset.
-
Start and Stop Tracking
You have the flexibility to initiate or halt tracking on your device, with location tracking and uploading adhering to your predefined configurations:
To start data tracking:
1 2// start data tracking AssetTracking.shared.startTracking()To stop data tracking:
1 2// stop data tracking AssetTracking.shared.stopTracking()
By following these steps, you'll effectively bind assets to your iOS device and commence location tracking as per your configuration settings. This allows you to seamlessly monitor and manage your assets using the NextBillion.ai iOS Tracking SDK.